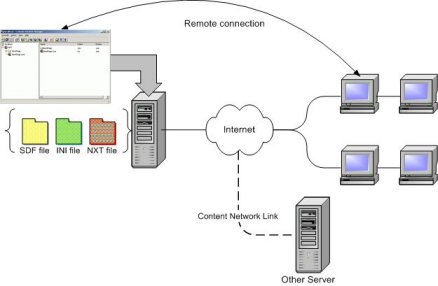
The Content Network Manager is a graphical user interface tool that handles all administrative functions for the NXT 4 Online server. The Content Network Manager manipulates the Site Definition File (SDF) to create table of contents (TOC) hierarchies, enable content retrieval and display, create content indexing, and manage content links to other NXT 4 servers. The Content Network Manager communicates with the NXT 4 server, whether locally or remotely, using a standard TCP/IP and HTTP (or HTTPS) connection. Figure 1 shows schematic Content Network Manager functionality.
Note:
When you use some features of Content Network Manager (for example, adding a collection to a site), you must
select files through the standard file selection dialog box. Note that the files that are displayed in the
window are located on the NXT server, not on the computer where you run Content Network Manager.
Also, note that you can access only files that are available for a user account that runs the NXT server.
Typically, this user account is Network Service account.
Figure 1. Content Network Manager Functionality
The SDF is an XML document that contains key information for each node on your NXT 4 site and for your site in general. The SDF is an XML representation of the hierarchical structure displayed in the Content Network Manager. The SDF is site specific: for every site on your server, there is a separate SDF.
The Content Network Manager provides the interface you need to view and alter the SDF. You do not need to stop and restart the web server when you make changes to the SDF through the Content Network Manager.
The SDB is an XML document that represent a backup copy of a site that is deleted in Content Network Manager (CNMgr). CNMgr renames the site definition file (.sdf) into site definition backup (.sdb) when the site is deleted.
For example, samplesite.sdf becomes samplesite.sdb. When you create a samplesite, CNMgr checks for a corresponding samplesite.sdb file, and if found, restores it and updates IDs.
You can access the Content Network Manager locally or from a remote location across the room or across the world. You can connect to and configure an NXT 4 site or sites locally or on a remote server by calling the server through the Server Connection window (see Figure 2), entering the IP address or host name, and entering a user name and password that has administrator privileges to the respective server.
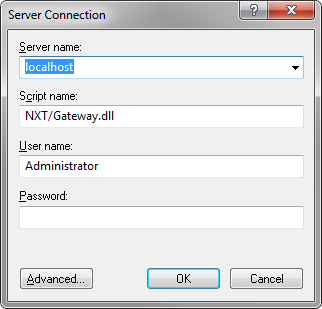
Figure 2. Server Connection window
The server connection window appears when you start Content Network Manager from Start menu, double-click
a Content Network Manager icon ![]() or click the Connect Server button
or click the Connect Server button  in the Content Network Manager interface.
NXT/Gateway.dll value is set
up during initial installation. You need to modify this field if a
different virtual directory has been set up.Note: If you have enabled access control on the server, you must provide the user name and password of the user with administrative rights. The default installation creates a user named Administrator and the password for this user is set during the installation of NXT 4.
You can enter the information in these fields to connect to the desired server, or use the drop-down list under Server name field to select a recently used server.
Figure 2 shows the Content Network Manager user interface, which consists of three panes: the Server tree pane, the Child list pane, and the Toolbar pane.
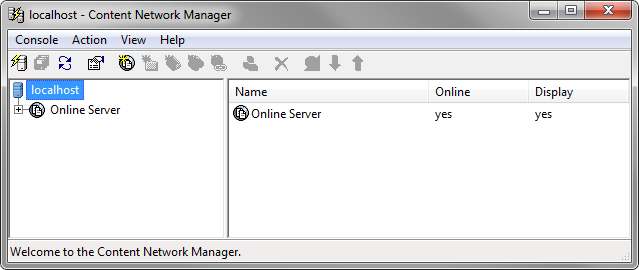
Figure 3. Content Network Manager
The Server tree pane shows the objects hierarchical structure for a given site. Each object of the tree structure is called a node, whether it is a branch or a leaf object. Each node, except the Server node, represents an entry in the TOC of the site. The Content Network Manager server pane can display the following types of nodes:
ccBuild.exe or Manage Content.You can move these nodes up or down to different places within the site
hierarchy by dragging and dropping, or by using the Up Arrow ( ) and Down Arrow (
 )
buttons in the Toolbar pane. You can also add or delete nodes similarly.
)
buttons in the Toolbar pane. You can also add or delete nodes similarly.
Although there are different node types, you see a consistent look throughout the table of contents of the site. You can search, browse, and navigate the entire site as one cohesive unit, although it might contain several different source node types, possibly even spanning several servers.
The Child list pane displays the name, online, and display status of each child of a selected parent.
The Toolbar section consists of the Menu section and Buttons section.
The Menu section has four options: Console, Action, View, Help. Figure 2 shows the view of the Menu section that is in the upper-right part of the Content Network Manager window.
The Buttons section has the following buttons:
|
The Connect Server button connects to a server to be managed. |
 |
The Save or Apply Changes button commits changes made in the Content Network Manager to the Site Definition File (SDF). * |
 |
The Refresh button refreshes the contents in your Content Network Manager server pane. |
 |
The Properties button displays any selected site, folder, service or collection node properties. * |
 |
The New Site button starts the process of creating a new site node in your Content Network Manager. * |
 |
The New Folder button creates a new folder node to place content collections or syndications. * |
 |
The Content Collections button creates or connects to an existing Content Collection. * |
 |
The New content service button Creates a service that rebuilds and updates your library on schedule by using the file system content bridge. |
 |
The New Syndication Link button creates a new Content Syndication Link to a remote NXT 4 site. * |
 |
The Build content service button Rebuilds and updates your library that was created as content service. |
 |
The Delete button deletes a selected site, folder, or content collection node from your Content Network Manager Server Pane. * |
 |
The On/Offline button toggles online or offline a selected node in your Content Network Manager Server Pane. This button affects a parent node's children. * |
|
The Down Arrow button moves a node down within the same parent node (folder) and hierarchy level. ** |
|
The Up Arrow button moves a node up within the same parent node (folder or site) and hierarchy level. ** |
* You can also access this function by right-clicking on
a given node and selecting the equivalent function from the menu.
** In order to move a node up a level or to a different
folder, use the drag and drop method.
The Properties window is not directly visible. To view the Properties window, select a node in the server tree pane, then click on the Properties button on the toolbar (you can also use the Action Menu Bar option, or right-click on the node and choose the properties option). The Properties window displays general information as well as other information specific to the node you select. The Content Network Manager retrieves these properties from the attributes in the SDF and INI file. Figure 4 shows a sample properties window for a folder node:

Figure 4. Properties window
The Content Network Manager requires three standard identifiers for every node: ID, Name, and Title. The labelling of these identifiers is left to your personal naming convention, that of your company, or the syntax limitations of your operating system.
Note: You cannot use forward slashes (/) and backslashes (\) in the names of files, folders, and collections. For the content services, the forbidden characters are: forward slash (/), backslash (\), colon (:), asterisk (*), question mark (?), quotation mark("), less than(<), greater than (>), and vertical bar (|).
The Content Network Manager is for online content deployment and allows you full access to the SDF and INI configuration files, providing an easy way to configure your NXT 4 server and its sites. The Content Network Manager allows you to add, move (within a respective site node), and delete nodes, as well as modify properties of those nodes (site node inclusive). You can access the Content Network Manager from a remote location, giving you the flexibility to configure a server from nearly anywhere.
Copyright © 2006-2023, Rocket Software, Inc. All rights reserved.